Saturday, October 30, 2010

Sweater Weather ...


Hello friends.  While visiting some of my favorite blogs this week, I happened upon a couple of delightful challenges that I just couldn't pass by.  The first challenge sets the mood and color with a gorgeous photo titled "Sweater Weather" over at Moxie Fab World.  Isn't it wonderful?  I'd love it ... in my size, please.  The second challenge provided the sketch from Lord Have Mercy.  It gives just enough to direction to define the shapes but then freedom for the right amount of embellishment.  Here are the images from both blogs ...


So ... with the inspiration of these two challenges, here is my project to share with you today.


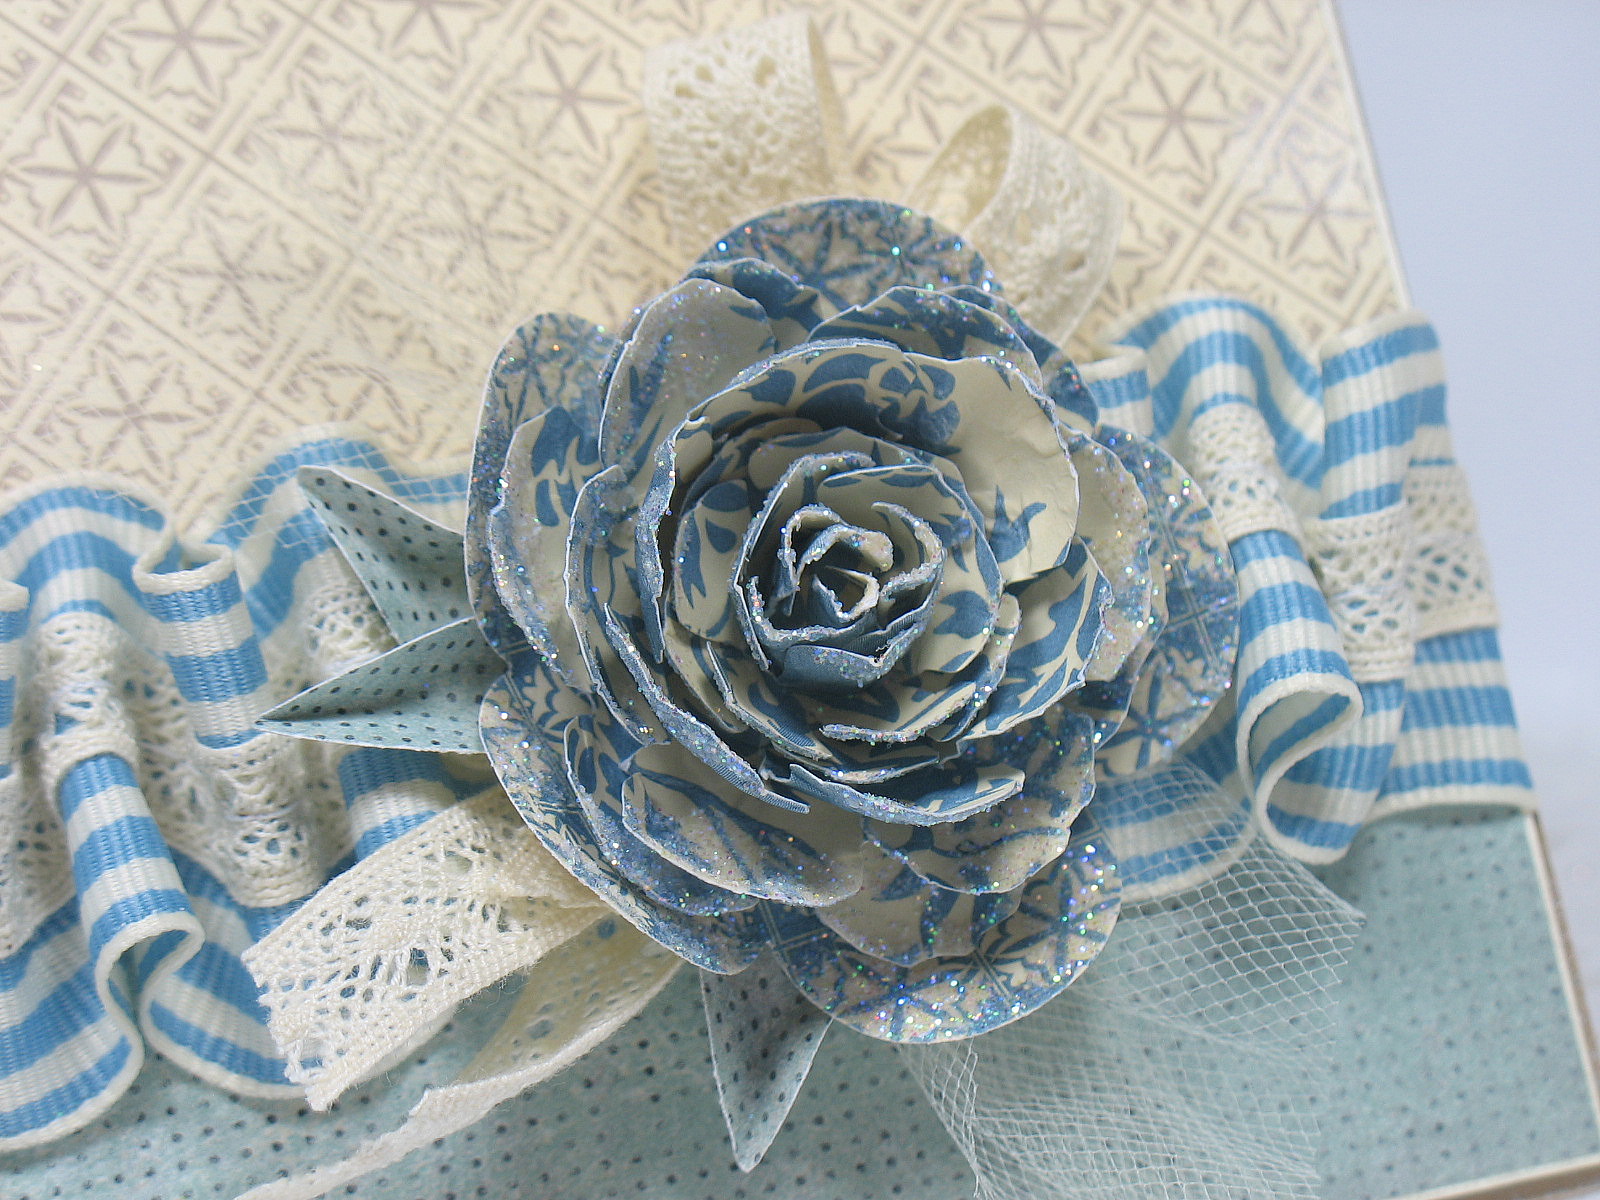
My card base is Soft Suede cardstock layered with Crumb Cake.  The sentiment is from a Hostess Set called Afterthoughts and is stamped in Soft Suede Classic Ink.  The papers are scraps from my drawer and pulling the colors from the sweater - I think they blend beautifully, don't you?  Our Top Note Bigz Die was used on the polka dots and our Scallop Trim Border Punch gave interest to the fleur-de-lis print.  I added a flourish of pearls which don't show well on the photo but are very pretty on the card. 


The ribbon you may recognize as Early Espresso 1-1/4" Striped Grosgrain.  It is so soft and ties beautifully - I absolutely LOVE this ribbon and have it in every color we offer.  Loops of  Victoria Crochet Lace is tied on with gold cording.  The flower is a gorgeous print of yellow and white made from flower shaped punches and dies .. here's a link to a video tutorial that will provide instructions.  The petals are "glitterfied" (feel free to double click on the image) with my favorite Dazzling Diamonds Glitter and the leaves are created with the 5 Petal Punch.

That's all for today.  Thank you for stopping by ... I enjoyed visiting with you! 

.

Wednesday, October 27, 2010

Lemon goodness ....


Hello everyone!  I told you in my last post that I had just received our new stamp set - Timeless Treasures.  I knew when I first laid eyes on these vintage images I would like them ... now I love them!  Paired with the beautiful colors Cajun Craze, Riding Hood Red, and Daffodil Delight, this card is so "happy" it makes me smile.  The Design Team at The City Crafter chose the colors and they are a gorgeous combination.  Of course I just had to use the wonderful sketch at The Waltzing Mouse Sketch Challenge - for the second time this week!  Let me tell you a little bit more about it ...

The card base is Daffodil Delight cardstock.  I also used Sunny Garden and Love Letter Designer Series Papers.  The paper at the bottom is a scrap from my drawer and the colors flow perfectly  ... the fall leaves being a definite bonus.  A quick zig-zag stitch around the edges and I was ready to move on.


I added white lace, some gold cording and linen thread.  The "lemon" tag is stamped, trimmed, and layered staying with my color theme.  A white pearl on the little bow adds a delicate touch.  The tea cup is stamped twice on Whisper White cardstock.  One I cut out and the other I punched with our Decorative Label Punch.  Using Dimensionals, I layered the tea cups then sponged on a bit of Frost White Shimmer Paint and then layered it all on more Daffodil Delight cardstock.  You can see the two little pearls placed on either side.


The flower is created from a lovely shade of cream dress lining and organza.  Melting the edges with a small candle is so fun!  I added the large white pearl and glittered the edges with Dazzling Diamonds (my all time favorite for sparkle).  The seam binding is dyed and scrunched.  Some more gold cording and a couple white leaf pins tucked in the back finish off the project.


Thanks so much for stopping by.  I appreciate your visits and I hope that you enjoyed your time here.  I'll see you again soon ... I have so much more to share!


.

Sunday, October 24, 2010

Uh ... Boo?


Good Fall Day to you, my friends!  It's a gorgeous morning and I'm sure my husband and son have a day of outdoors exploration planned.  They are both my "Boy Scouts" ... I couldn't be happier.  Well, except for that milk weed (in full bloom) that they brought home yesterday - it's now propped up in the corner of my son's room.  THAT ... I probably could have done without (sigh).

Another great sketch can be found over at The Waltzing Mouse Sketch Challenge.  I think what I like about the sketches I find there is that they give me enough direction to create but they are simple so that they don't constrain me either.  Sometimes with too many shapes and sizes I get stressed trying to fit it all in!  I'd also like to point you towards a marvelous blog called Moxie Fab World.  This is a site you will want to visit every day.  Cath is incredible and there is always something new to see.  They have some fantastic Halloween cards posted and a "Perfectly Placed Pleats" challenge.  You will want to look into both!

On to my card for today.  You know I love our Night Owl Designer Series Paper ... it's so perfectly scarey.  I used the skull print for my focal point....but of course I had to "bling" him up a bit.  I started with distressing the edges using Distressing Essentials in charcoal.  Then I added Silver Glass Glitter to the edges.  Well that still wasn't enough for me.  So I tried our Silver Tinsel Trim and that was exactly what I was looking for!  He looked spooky with just the right amount of bling.  Then ... well, I added the seam binding dyed with Pumpkin Pie Classic Ink ... and started laughing.  Hence the title of my post "Uh ... Boo?".  I am sure this spooky "Edgar Allen Poe skull-head type of a guy" does NOT appreciate a bow on his head.  So, to make him feel better ... I added a button.  (Giggle).


Digging thru my scraps I was able to put together the remainder of the card with various Halloween colored prints.  The rosette is made with 1/4" folds and it tucks in nicely down in the lower right corner.  The black star is chipboard covered in black Chunky Essentials Glitter and is tied on with grey floss.  The bat is punched twice with our Bitty Bat Punch from two different Night Owl Designer Series Paper patterns and layered.  I added gems from our Black Flourish Designer Jewels to make him (or her) feel special too.


I love this sketch so much that I think I'll be making another real soon.  I just got our Timeless Treasures stamp set and I can't wait to ink it up!  I feel a bit of vintage coming ...

Thanks for stopping by and I hope you all enjoy your day!


.

Sunday, October 17, 2010

Soft Blue and Mint Green


Hello friends.  What a beautiful day ... the air is crisp, the leaves are falling, a perfect day for picking out pumpkins.  After many oohs and aahs (with lots of indecision in between) the kids finally made their selections.  Our porch is filled with spider webs, corn stalks, pumpkins, and mums ... I love this time of year....don't you?

The Design Team at Play Date Cafe have the most gorgeous color combination to inspire the artist in you.  Just look at this photo ... isn't it wonderful?  The colors are so soft ... sigh.


Here's what I was inspired to create.  I used the sketch from Waltzing Mouse Sketch Challenge - sweet and simple.  Plus I've always wanted to try the "gathered ribbon look" and this week - thanks to the Designers at Sweet Stampin' Challenge - I had a reason to try it!  Here I used Marina Mist Striped Grosgrain layered with Chantilly Crochet Trim.  It's a beautiful combination.  A little more lace and tulle behind the flower softened the look of the card.  The "thank you" from Because I Care Hostess Set was stamped in Marina Mist Classic Ink on Very Vanilla cardstock.  I used one end of our Decorative Label Punch to give my sentiment a soft shape.  I've never used Shimmer Paint before ... it's one of those things I bought and never tried.  Sponged lightly around the outside of my card - it's gorgeous!  It adds the most subtle shimmer - well, I can see myself using this again soon!


My papers are retired but they were perfect for this challenge, don't you agree?  And I loved making the flower!  You can view a link to the instructions on my previous post.  Of course a bit of Mod Podge and Dazzling Diamonds Glitter on each little petal is a must.  Click on the image to really see the sparkle.  I used the same Sage Shadow paper to create the leaves.  Using the 5 Petal Punch was the first step.  Then I cut the flower into 5 pieces (each petal becoming a leaf).  A quick fold down the length of the petal and VOILA .. a leaf!  You see the three "leaves" peeking out that I used for this flower.


Thanks for for visiting with me.  I hope you enjoyed your stay ... good night everyone!

.

Saturday, October 16, 2010

Light up the Night ...


The color combination from Colour Q is just gorgeous, the flower technique is new (how did I do for my first try?) and the glittery arrow was so fun to make!  My card base is Pumpkin Pie cardstock covered in Nite Owl Designer Series Paper.  I really like the writing ... it's Edgar Allen Poe - perfect.  I used Old Olive and Basic Black cardstock for matting.  The "Wayne Candelabras" sign is cut right from the Nite Owl paper!  I LOVE it!  As you can see I "glittered" it up a bit with White Chunky Essentials.  Our Black Flourish jewels add interest to the top of the card.


The tag is a rub-on from Spooky Night which I applied to Basic Black cardstock then punched out with the Jewelry punch.  The flower is a new technique that I learned  here.  I put a little black jewel in the center (you can just see it in the photo above).  It was super easy to make and I hope to get better at it over time!  Thank you 'jannaviles' for the tutorial!


The arrow is chipboard from our Mix and Match collection.  I glittered it up in Olive Fine Supernova Glitter and then added a bat with my Bitty Bat punch.  Every girl needs a little sparkle, right?!  (Even girl bats!)


Have a wonderful weekend and thanks for visiting with me!

The City Crafter ... is featuring "winged things" this week - like my bat!
The Shabby Tea Room ... has the sweetest inspirational photo of pumpkins which remind me of Halloween and that leads to spooky scarey things and well ... you know the rest.
Colour Q ... combine Black, Pumpkin, Olive, Grape, and White!
Fussy and Fancy ... celebrates Halloween this week!
Stampin Royalty ... has lots of spooky things to see.  Thanks for inviting me to play along!
I {heart} 2 Stamp ... always has fabulous sketches like the one I used on this project.


Monday, October 11, 2010

Holidays ...


Aren't Holiday's a wonderful time of the year?  Any Holiday is fine with me.  It's a reason to gather with friends and family...to celebrate a special occasion ... to talk, laugh, and enjoy each other.  I look forward to the upcoming Holiday season!

I have another Christmas card to share with you.  Strips of Designer Series Papers (Love Letters and Deck the Halls) cover the front of the card.  I am lovin' this look!  The wreath from our Northern Hearts Hostess Set is stamped in Always Artichoke.  Little pearls from our Basic Pearls add dimension.


My seam binding has been dyed with Riding Hood Red ink.  The button is a stray that found it's way into my button drawer.  ("Can I keep it, Mom?")  I used Linen Thread and a Merry old greeting stamped in Riding Hood Red ink (our Jewelry Tag Punch made it easy).  Once again, the Distressing Essentials kit helped soften the edges.


Thanks for stopping by - I hope you visit again soon!  You can see more inspiration at these sites ...

The Secret Crafter Saturday Challenge ... the Design Team is featuring "distressing techniques"
The Waltzing Mouse Sketch Challenge ... has the cutest sketch with a horizontal sentiment and a "centered feature".
Crafty HOs ... red, green, and brown are our color combination this week!
The City Crafter ... they are celebrating Holidays!

Supplies ...
#117162 - Love Letters Designer Series Paper
#120810 - Deck the Halls Designer Series Paper
#120833 - Northern Hearts (wood mounted)
#121145 - Northern Hearts (clear mounted)
#105219 - Always Artichoke Classic ink pad
#111927 - Basic Pearls
#111839 - Riding Hood Red ink refill
#111836 - Riding Hood Red Classic ink pad
#104199 - Linen Thread
#117190 - Jewelry Tag Punch
#118762 - Distressing Essentials


.

Saturday, October 9, 2010

A splash of color ...


As I look out my window and into the garden, the leaves are beginning to turn.  There is still plenty of green but there are also wonderful splashes of bright color.  Orange, red, yellow ... gorgeous against the greens that are still hanging on to summer.  Fall is my favorite time of year.

Today I welcomed some dear friends to come play with me.  One of our projects used soft neutral colors with a splash of Cherry Cobbler dyed seam binding.  I could have added more ink to darken the value but I do so love the lovely shade I got.  Elements of Style and Artistic Etchings stamped in Soft Suede and Always Artichoke decorated the Very Vanilla cardstock.


The envelope was created from our gorgeous Deck the Halls paper collection.  It's the perfect size for a gift card.  An old forgotten button added a touch of whimsy and the Basic Rhinestones provided a bit of  sparkle.


Thanks so much for visiting with me today.  I'm so glad you had a moment to stop by and I'd love to hear from you!  Here are some more fun blogs to visit ... I'm sure they will inspire you too -

Sweet Stampin' Challenge ... Diamonds are a girls best friend
No Time to Stamp ... Natural and Earthy
Stamp Challenges ... Something Punchy
The 3 Muses ... Music

Supplies:
#119788 - Cherry Cobbler Classic Ink Refill
#118517 - Artistic Etchings (wood  mount)
#120573 - Artistic Etchings (clear mount)
#101650 - Very Vanilla cardstock
#155657- Soft Suede Classic Ink pad
#105219 - Always Artichoke Classic Ink pad
#119871 - Corner Rounder punch
#119850 - 1 3/4" Circle punch
#120810 - Deck the Halls Designer Series Paper
#119246 - Basic Rhinestones


.

Sunday, October 3, 2010

Cadbury Boo ...


A dear sweet friend gave me a Cadbury chocolate bar this week.  It was so good I wanted to pass on the joy of endulging in this blissful chocolate.  So, my daughter and I made a few "boo-tiful" gifts for some of the teachers at school.


Aren't they sweet?  (No pun intended.)  We used scraps of the most wonderful background papers.  Our color combination of Riding Hood Red, Old Olive, and Pumpkin Pie was inspired by the Design Team at Color Throwdown.  I dyed some seam binding with Pumpkin Pie and Tangerine Tango ink, smashed it into a ball and let it dry.  It's crinkled up goodness is perfect for this project.


I love this stamp!  Isn't it delightfully spooky?!  The circle tag was distressed with charcoal ink and the Midnight Raven stamped in Basic Black ink.  I added a few rhinestones to brighten things up. 

The black flowers were created using a Scallop Circle Punch and Black Waffle Paper.  It's wrinkled, crinkled and wonderful!  Strips 3" wide were folded four times and sandwiched between printer paper ... which makes it easier to punch without tearing.  These flowers are 8 layers thick held by a dazzling black Glimmer Brad.  So much to love!

Visit Your Next Stamp to see more flowers "grown" by the talented ladies participating in this week's challenge. 

Thank you for stopping by - sweet dreams!

Supplies
#116529 Midnight Raven
#118762 Distressing Kit
#101179 Basci Black Classic Ink
#119246 Basic Rhinestones
#119854 1 3/4" Scallop Circle Punch
#120985 Waffle Paper (Basic Black and Early Expresso)
#121003 Glimmer Brad Basics


.

Saturday, October 2, 2010

Fall ....


This is my favorite time of the year.  It's a rainy day but that doesn't deter my feelings for season ... fall colors, crisp morning air, and piles of leaves.  We'll be getting our pumpkins and corn stalks for the front porch soon ... and baking chewy ginger cookies - yum.

The designers at Colour Q opened us up to any of their past color combinations we wanted .. and they provided the sketch too!  I love all the colors they put together and I just couldn't pick a favorite.  So .. when in doubt ... call for help.  Here's the sketch and the color combination my daughter Sabrina and her friend Lucy selected.


Isn't this top sweet?  That Poppy Parade is just gorgeous!  Thanks for pointing me in this direction girls!


I used two Designer Series Papers for my card.  The base is So Saffron with a sutle zig-zag layed with a Poppy Parade print  from the Sunny Garden collection (cut with the Top Note Die).  My chipboard is from On Board Mix & Match .. painted then glittered with Dazzling Diamonds.   Clear Bitty Buttons with white thread followed the sketch in the upper right corner.  And along the bottom is Stampin' Up's gorgeous Raven Lace Trim


The ladies at Tuesday Throwdown challenges everyone to use at least three punches.  My flower is created with three punches ... Fancy Flower Extra Large, 5-Petal Flower Extra Large, and a retired smaller flower punch for the center.  Made out of Whisper White cardstock, I sprayed it with Smooch Spritz Vanila Shimmer and added a black rhinestone from Black Flourish Designer Jewels.  The flower leaves are from the same Sunny Garden paper (reverse side) and created with Little Leaves die.  Resting on a rosette made of lace, the tag stamped in Bashful Blue and punched with our Jewely Tag punch says it all.

You can see more "flower and lace" projects at The City Crafter ... it's their theme of the week!
And the ladies at Stampin' UP Only Challenges have more wonderful ideas on how you can use your Top Note die!

Thanks for stopping by ... enjoy the colors of fall!

Supplies ...
#119831 Sunny Garden Designer Series Paper
#133463 Top Note Die
#119240 On Board Mix & Match
#102023 Dazzling Diamonds
#118761 Bitty Buttons
#120988 Raven Lace Trim
#118073 Fancy Flower Extra Large Punch
#119880 5-Petal Flower Extra Large
#100730 Whisper White Cardstock
#120987 Black Flourish Designer Jewels
#114511 Little Leaves Die
#105209 Bashful Blue Classic Ink
#117190 Jewery Tag Punch


.